
Waterfall
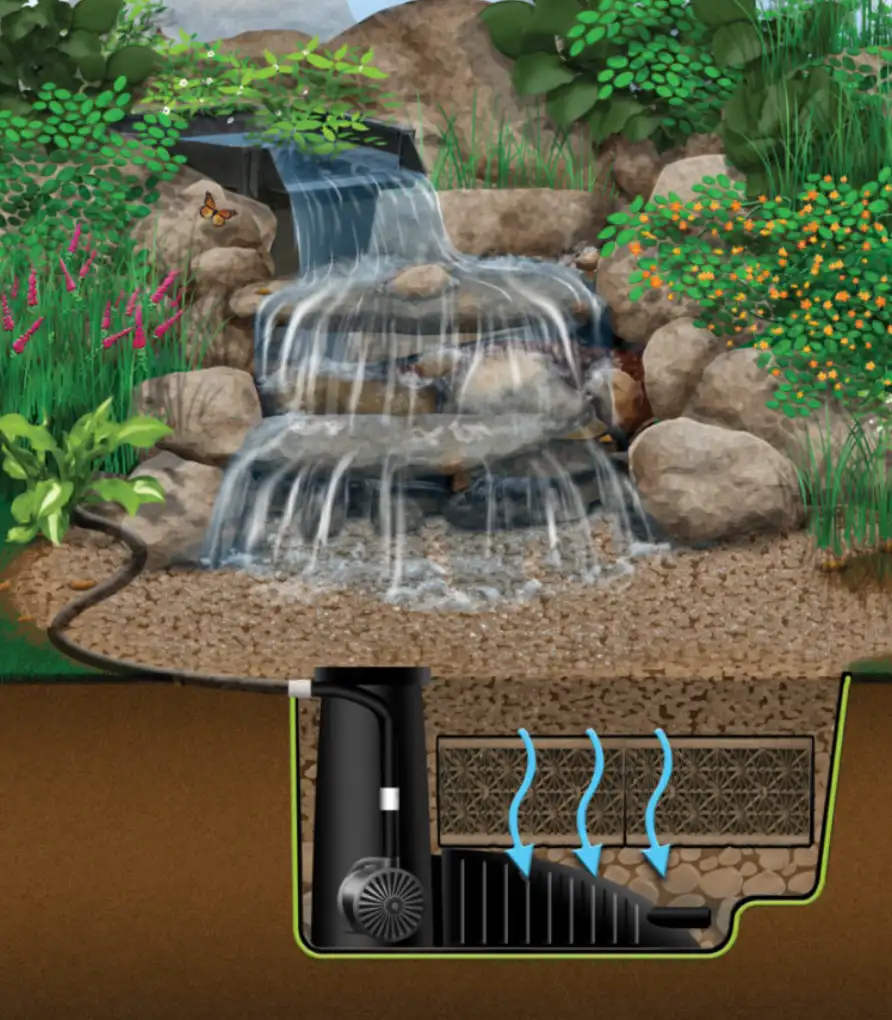
When planning the construction of an outdoor waterfall, you should focus on two structures. Cascade pool structure of the waterfall itself , containing water . The latter is often more complicated, let us tell you how to build such a waterfall, as well as simple, and cheap. For this, many homeowners use stone in their backyard (or something you can easily find elsewhere). Once the two structures are in place, a pond pump is used to recirculate water from the pond to the top of the waterfall.
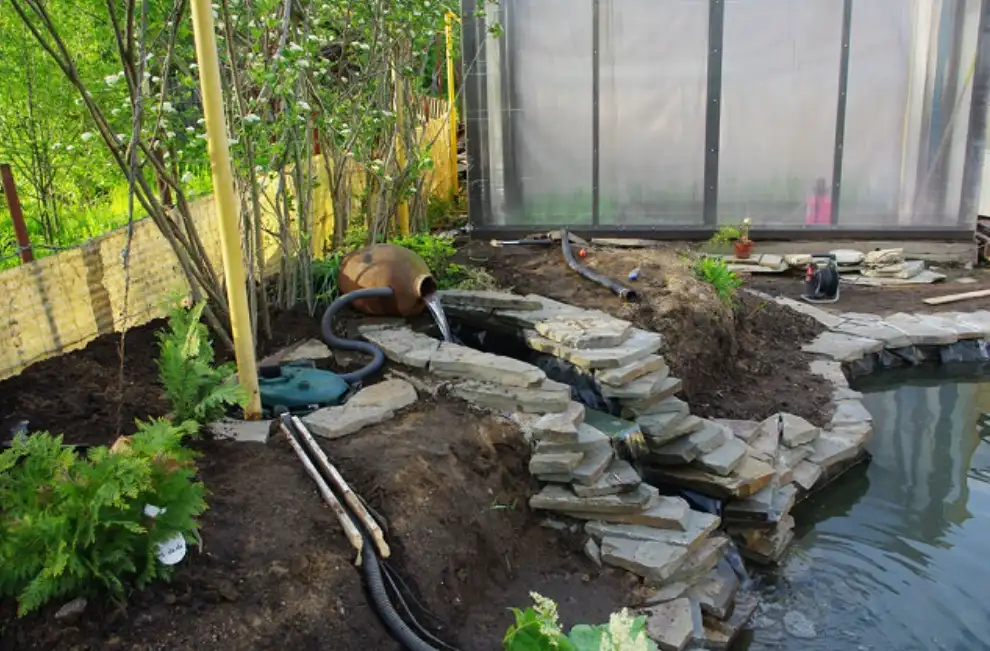
Outdoor waterfalls come in all shapes and sizes and create an accent. When considering design options, the focus is on how to raise the waterfall to the right height. Landscape designers often build sailboats (i.e., artificial slopes) to take advantage of the slope’s slope or to create such a space behind a pond if the bottom is generally flat. Either way, it means a lot of work. And it won’t be cheap. When creating a large outdoor waterfall, you need to lay a flexible bottom line between the top of the waterfall and the pond.
The stone is then placed on top of the cladding to conceal and secure it in place.
Unless you are building a large outdoor waterfall, this work and expense is not necessary. In fact, many homeowners landscaping in a small space prefer a small waterfall if it makes a surprisingly soothing sound when the water hits. One alternative is to use precast concrete forms that mimic stone to create cascading structures. They are laid along the edge of the pond, so they are easy to install and compact. But they do cost money. If you have access to natural stones, why not use free resources?
But, by the way, there is another alternative – creating a cascading fountain – if you only care about cascading water (as opposed to a real waterfall).
Waterfall material
Materials needed to build an outdoor waterfall – the affordable way!
- stone.
- submersible pump.
- a tube going from the pump to the top of the waterfall.
- large plastic flower pots (or similar) for the house.
- rigid pond liners.
- carpenter’s level.
- shovel.
- sand.
- garden hose.
Pumps, pipes, and hard pond covers needed to create a waterfall in the backyard can be purchased at home improvement stores. We will talk about how to use a flower pot later in this article.
Try to find 25 to 30 stones. A combination of sizes and shapes is acceptable, but there should be at least a few large flat stones. Since we’re talking about a “drywall” project, it’s better that the stones be flat. There are many variations. They are easy to stabilize. Gather a few more small stones and place them around the edge of the pond (to hide the plastic edges) as decorative elements.
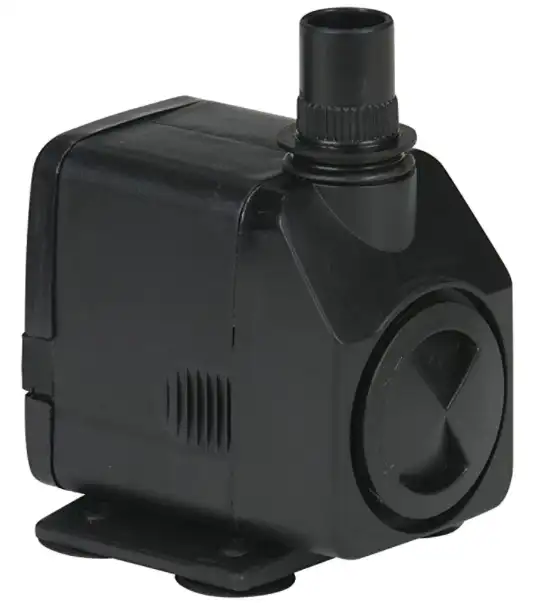
Submersible pump
Use a Little Giant submersible pump with a 6-inch cord. This is a 130-gallon-per-hour pump. That means it can move 130 gallons of water per hour, which is enough for a small garden pond. This pump is the right size. Its size is 1/2 inch. A small, cheap, hard plastic pond liner (sometimes called a “pre-formed liner”) is 2 inches in diameter and 7 inches deep.
We will be using sand to create a “conditioned bottom” for our rigid plastic pond liner. Along with a carpenter’s level, it will come in handy when you try to install the pond liner horizontally into this hole.
However, before digging an outdoor waterfall, have a certified electrician install an outlet (ground fault interrupter) near the ponds and waterfalls. Since the cord length for the selected pump was 6 feet, will be within 6 feet of the outlet. The ideal place to install a waterfall is near a patio where you can listen to soothing sounds.
There is another issue to look out for even before contacting an electrician. To make sure that digging waterfalls and outdoor ponds will not damage underground utilities, you should call a utility company.
Excavate the pond to build the waterfall
Before you get to work, pull weeds from the point of the waterfall pond you’ve chosen. After that, level the area. Now you are ready to dig the hole into which the liner will be inserted.
By the way, it is recommended to take care of the design of the waterfall pond first. This is due to the fact that the stones are simply placed so that the stones of the cascade waterfall design protrude above the waterfall. As a result, some of the lower stones are very close to the waterfall pond. Such stones can be loosened by building the cascade waterfall structure first and then burying the waterfall pond. In addition, the protrusions of the waterfall structure will break through during digging.
The depth and diameter of the hole in the waterfall pond should approximate the size of the pre-built cascade pond. However, if the hole turns out to be too large, this can be corrected later by backfilling it with sand.
Actually, the plan is for the sand to sink to the bottom of the hole. The sand is malleable (which will allow you to play with the pre-formed height of the sleeve). Sprinkle about 2.5 cm of sand on the bottom so that the edge of the sleeve is about 2.5 cm above the ground. This slight elevation will minimize soil drainage problems in the waterfall pond.
Insert the finished liner into the hole in the waterfall pond. Determine if it will be level by putting a carpenter’s level on top (left to right forward and backward, doesn’t that work? Then remove the liner and scrape the sand off the bottom of the liner until it is level.
Be careful before you start building the waterfall itself. Strategies for minimizing water loss. However, no matter how well you know how to minimize water loss, it is advisable to periodically check the water level in the waterfall. If the pond becomes dry without water, the pump will burn out.
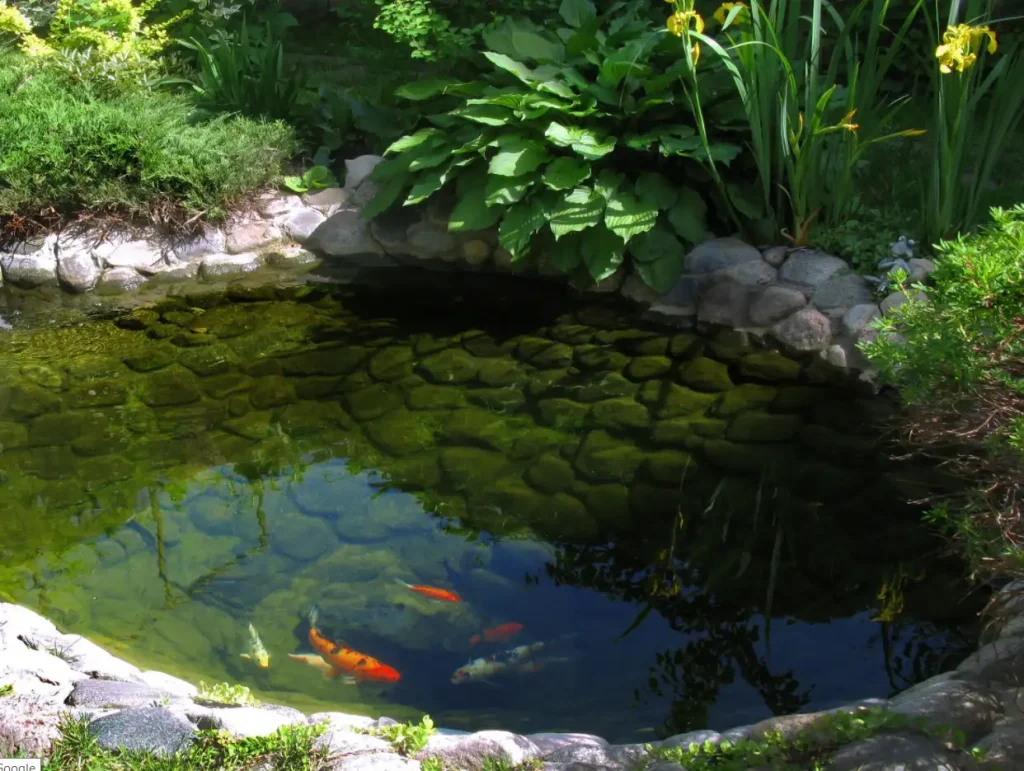
Therefore, the pump should be turned off at night or when you leave the house. Of course, if you are frugal, you will refuse to work when you do nothing to save money. Since the water feature is for decoration as well as recreation (it’s not a fish pool), there’s no reason to keep working if you don’t like it.
Waterfall construction
When the pond is ready, that means one of our two structures will be in the way. It’s time to move on to the more interesting structure – the cascade structure itself. And that means taking another look at the rocks we will be using.
The most important rocks can be called “watershed rocks.” By “watershed” we mean a rock through which water flows directly. This example of a cascading design uses two rocks. This gives the cascading design two levels (separate waterfalls) to increase the visual impact.
The spillway stone should be relatively flat (as opposed to more rounded shaped stones). It should also have sharp, square edges. Through these edges, water flows in a cascade. If the edges of the stone are slightly curved, some of the water will follow this curve and flow under the stone. In the latter case, not only will the cascade effect be less impressive, but you will also lose a lot of water (because it won’t flow into the pond).
Waterfall model
In short, the reason for choosing a spillway for a cascade design is to choose the rock that is most likely to direct the falling water in the most precise direction. As we’ll see later, how you place the stones in the spillway is also important. In addition to relatively flat stones with sharp edges, try looking for softer stones. However, sometimes stones swing too much around the edges, leaving a depression in the center.
Natural channels in these rocks are very useful for creating spillways in cascade structures. Their angles keep water from slipping where it doesn’t want to go (behind rocks, for example).
You may be interested in one of the aforementioned consumables. “Large Plastic Flower Pots. The pot simply serves as an enclosure for the coffin (inside the cascade waterfall design). It can easily be replaced with something else that fits better. Choose plastic garden pots because there are always plenty of garden pots (you can always find uses for them!).
For example, it is better to use a terra cotta pot, as it provides better stability. A hard plastic box will also do. The idea is to create a sort of house with a water pipe and all the stones laid out around it. This house will not be visible at the end. It will be hidden in the center of the stone.
Basically, you have to make 4 stone walls around the pot and put them in the box. By making a small groove for the pipe to go under the stone so that the stone will not fall down. This will free up the pipe and allow you to move the pot up and down freely. This will give you the space you need because you don’t know exactly how high you want to raise the water until you are done building the stones.
After placing the first row at the front, it was covered with black plastic. It was 4 feet wide and 3 inches long. Pull one end of the plastic pot to the top and slip the other through the ledge of the pre-made pond liner and submerge it in the water. Camouflage the plastic under the rock so it won’t be visible in the pond. (The end of the plastic is hidden in the rock against the wall.) This cheap plastic (just cut from trash bags) can be used as a replacement for the more expensive flexible pond liner you will use in your larger cascade. (And you can use it for this project, too. Budget).
Plastic serves the same purpose: it can collect more water and drain it into the pond than rocks. Otherwise, water lost to splashing will hit the plastic and flow back into the pond.
Also, after laying the first row of rocks (and right after laying the black plastic), place each long flat rock on top of the plastic and set it right on top of the plastic. Since it will serve as a shelf for the first stone, call it a “stone shelf” in the future. To replicate this cascading design, find a long flat stone of sufficient mass so that it protrudes.
Stacking stones and working with plumbing
Turn the flower pot upside down and put the pipe through the hole in the bottom. Install the center wing (still upside down) – this will be the stone structure. How far away should you be from the back of the pond? It depends on the depth of your stone. The stone facing the pond should be in contact with the pond. If possible, the pond should protrude slightly. So, the stones you want to use are 8 inches (that is, front and back), and the front of the pot should be about 8 inches from the edge of the pond.
How long should the tube be? Where should I place it? As for length, I would suggest not cutting right after trying to get the perfect size. Instead, give up more length than you need and cut later if you need to. This will make your job much easier! Choose the left or right side of a pond or stone waterfall that will run along the ground. You can go back for a cosmetic touch at the end of the project and cover it with rocks and/or mulch.
Generally speaking, when building a stone wall, the seams are best loosened. Of course, these are very small stones, so it’s not a structural problem. However, it does look better, so try laying the stones apart.
As mentioned above about stone selection, after passing the first row of stones in the front, put 1 long flat stone across all the stones. The function of this stone is to form protrusions, so it is a key element in the design of the cascade. Using it as a ledge, place the first diversion stone (see below) so that it protrudes far from the pond.
Continue to build walls until you reach the desired height. Once you have placed the 4-wall pot, you need to place 2 long stones across the wall from the front and back or from left to right. If necessary, pull on the tube to increase its length, and carefully advance the tube between these two long stones to hold it in place.
Place the first watertight lock on the shelf. It should protrude over the pond further than the ledge (ideally, the top should be aligned with the center of the pond, but this is difficult to achieve). Raise the first bleeding stone in the back to improve water flow. You can use a spacer (a small flat rock) to lift this rock or boulder in the wall.
Bend the end of the tube toward the pond and place one or more acromions on it. “Nose” under the waterfall will speak and calm down. “Lock stone” means a stone that can partially conceal the pipes, and/or a stone that is gently pressed against a second waterproofing stone (not yet removed). Make sure that most of the weight of the capstone is on the stone (or gasket) into which the pipe is inserted to avoid flattening it. You will have to play around with the muzzle height when you start hitting the rocks with the second spillway.
Place the second spillway stone on top of the first spillway stone. Again, use a spacer to raise the stone from behind to get a steep slope.2 One way to think of boulder placement as a spillway is like two shingles on a roof. They are both sloped and the top overlaps the floor to form a continuous parachute through which water can be poured.
The position of the end of the tube forming the spout can now be determined with greater accuracy. You just need to measure it on the surface of the stone as a second waterproofing. Again, lengthen or shorten the tube if necessary.
You are ready to fill the pond with water, plug in the pump cord and check the flow of the natural stone waterfall. Undoubtedly, you will need to make some adjustments before you do it right. The goal is to let the water sink as close to the middle of the pond as possible so that it doesn’t spill out. When it comes to cascading design, however, there are some tradeoffs. The higher the height, the greater the visual impact, but the higher the height, the greater the water loss (splashing can be severe).
Another consideration for height: keep the natural stone waterfall proportional to the pond. A general rule of thumb is that the smaller the pond, the shorter the stone waterfall.
Always keep home safety tips in mind when taking on a project like building a natural stone waterfall. Another project that might be interesting is to build a small pond and use hydroponic plants around it.


